This article was generated using AI and is based on real customer reviews from the Amazon platform. It contains affiliate links, meaning we may earn a commission—at no extra cost to you. As Amazon Associates, we earn from qualifying purchases.
Essential Steps for Cleaning a Blackhead Remover Vacuum
Key Takeaways
- Regular cleaning helps maintain the functionality of your blackhead remover vacuum.
- Follow specific steps for disassembling, cleaning, and reassembling the device.
- Use gentle, non-abrasive cleaners to avoid damaging the device.
- Proper maintenance prolongs the life of your beauty tools.
Blackhead remover vacuums are popular tools for deep cleaning your skin. They help in extracting blackheads and minimizing pores effectively. However, like any beauty tool, they require proper care and maintenance to operate efficiently. In this article, we will guide you through the essential steps for cleaning your blackhead remover vacuum, ensuring that it continues to function properly and safely.
Why Cleaning Is Important
Cleaning your blackhead remover vacuum is crucial for several reasons:
- Preventing the buildup of bacteria to avoid skin irritation.
- Ensuring optimal suction power and functionality.
- Prolonging the lifespan of the device.
What You’ll Need
Before you start cleaning, gather the following materials:
- Soft cloth
- Warm water
- Gentle soap or cleaning solution
- Alcohol wipes
- Toothbrush (optional)
Step-by-Step Cleaning Process
Step 1: Disassemble the Vacuum
Begin by carefully disassembling your blackhead remover vacuum. Remove any interchangeable heads and the collection chamber according to the manufacturer's instructions.
Step 2: Clean the Interchangeable Heads
Use warm soapy water to clean the interchangeable heads thoroughly. For stubborn residue, use an alcohol wipe. Rinse and allow them to air dry completely.
Step 3: Clean the Collection Chamber
Using warm water and a gentle soap solution, clean the collection chamber. Make sure to remove any residue that may have accumulated during use.
Step 4: Wipe the Main Body
Using a soft cloth slightly dampened with warm water or an alcohol wipe, gently wipe the main body of your blackhead remover vacuum. Avoid getting any water into the device.
Step 5: Reassemble the Vacuum
Once all parts are completely dry, reassemble your blackhead remover vacuum as per the instructions.
Step 6: Store Properly
Store your device in a clean, dry place, preferably in a dedicated storage case, to keep it hygienic and in good condition.
Tips for Maintaining Your Blackhead Remover Vacuum
Beginner’s Section
- Use the device no more than once a week to prevent skin irritation.
- Always exfoliate your skin before using the vacuum to soften blackheads.
- Keep your vacuum and its accessories clean after every use.
- Refer to the manufacturer’s manual for specific maintenance instructions.
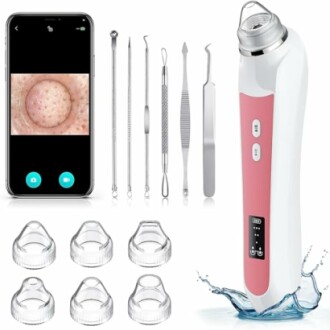
- Consider using the Blackhead Remover Vacuum with built-in 1080P HD camera for better visibility while cleaning.
Comparison of Various Cleaning Tools
| Tool | Purpose | Frequency of Cleaning |
|---|---|---|
| Blackhead Remover Vacuum | Extraction of blackheads | After each use |
| Makeup Brush Cleaners | Cleaning makeup tools | Weekly |
| Facial Tool Cleaners | Cleansing facial tools | Daily |
Conclusion
Regular maintenance and cleaning of your blackhead remover vacuum are vital for ensuring its longevity and effectiveness. Following the steps outlined in this guide will help you keep your device in top condition, promoting better skin health and cleanliness. For more insights on beauty tool hygiene, check out our Importance of Beauty Tool Hygiene and Top Products for Tool Sanitation.
 Must-Have Tool
Blackhead Remover Vacuum
The Blackhead Remover Vacuum by Ottleba features an HD camera and multiple suction heads for effective blackhead removal.
Learn More